Pink Miltonia Orchids in Watercolor

Pink Miltonia Orchids in Watercolor

I painted these pink miltonia orchids last spring but I couldn’t resist re-posting them now that I’m able to capture a better likeness of the original painting using my new scanner. This painting was based on a tutorial in the book, “Orchids in Watercolor” by Ann Mortimer.

Pink and White Tulips in Watercolor

Pink and white tulips in watercolor

Happy spring, everybody. I hope you’re enjoying this beautiful Easter weekend. The weather is finally warming up, the redbuds and cherry blossoms are in full bloom, my phlox are beginning their annual spring show, and the tulips will soon be on full display. After the long, cold winter I’m so excited to see these signs of spring.

Pink and white tulips in watercolor.

Cymbidium Orchids in Watercolor

Cymbidium Orchids in watercolor

I’m still playing around with my new scanner this afternoon on yet another rainy day (goodness, when will it end?). Laundry and housework can wait; I’m having way too much fun.

Learning how to use watercolor pigments was certainly a challenge, but it was well worth the effort. I love the bright, transparent, highly saturated colors.

Cymbidium orchids in watercolor. This painting is based on a tutorial in Ann Mortimer’s book, “Orchids in Watercolor.”

First Scan on My New Epson Perfection V600 Photo Scanner

Night Fairy in Watercolor

What a beautiful scan. My watercolors never looked so good. The Epson Perfection V600 photo scanner is affordable, compact, lightweight, easy to set up, and a snap to use. Since I typically photograph my artwork in the evening, I was plagued with artificial lighting issues and shadows that I couldn’t easily correct in Photoshop without distorting the color. Bye-bye lighting issues and unwanted shadows. Hello gorgeous color.

The Epson Perfection V600 also solved a problem I was having with my camera capturing the texture of the cold press watercolor paper that I typically use. I don’t want that texture to appear on high-quality prints. Thank you so much for the fabulous gift, Mom, Greta, and my bestie, Tami. It looks like instead of doing housework and laundry on this rainy day, I’ll be playing with my new scanner.

Night fairy in watercolor on cold press Acquarello Artistico paper by Fabriano. This painting is based on a tutorial in the book, “Enchanting Fairies–How to Paint Fairies and Flowers,” by Barbara Lanza.

Moth Fairy in Watercolor

Moth Fairy in Watercolor

My daughter and I have an ongoing disagreement over this painting. My intent was to paint a male fairy since all of the fairies I’ve painted thus far have been female, but she insists that this fairy looks like a girl, too, because of its long locks and the way it’s sitting on the daisy. I disagree. I think it clearly looks like a boy. What are your thoughts–boy or girl?

This painting is based on a tutorial in Linda Ravenscroft’s book, “The Fairy Artist’s Figure Drawing Bible.”

Fuchsia and Hummingbird in Watercolor

Fucshia and hummingbird in watercolor

Winter has definitely arrived. It’s dark and rainy and cold today. Even the dogs don’t want to venture outside. It’s been pouring here for hours so lately I’ve been dreaming of spring–as you can see from my latest painting.

I’m a big fan of color so this brightly colored hummingbird tickled my fancy. This painting is based on a tutorial in the book, “Painting Garden Birds” by Sherry C. Nelson. The book is geared towards oil painters, but it translated easily into watercolor. This book has been sitting on my shelves for years. I’m glad I finally pulled it off the shelf and put it to good use.

Holiday Porch Makeover–All That Glitters is Not Gold…

purple Christmas wreath close up

Sometimes it’s silver…

and purple.

Purple and silver holiday porch

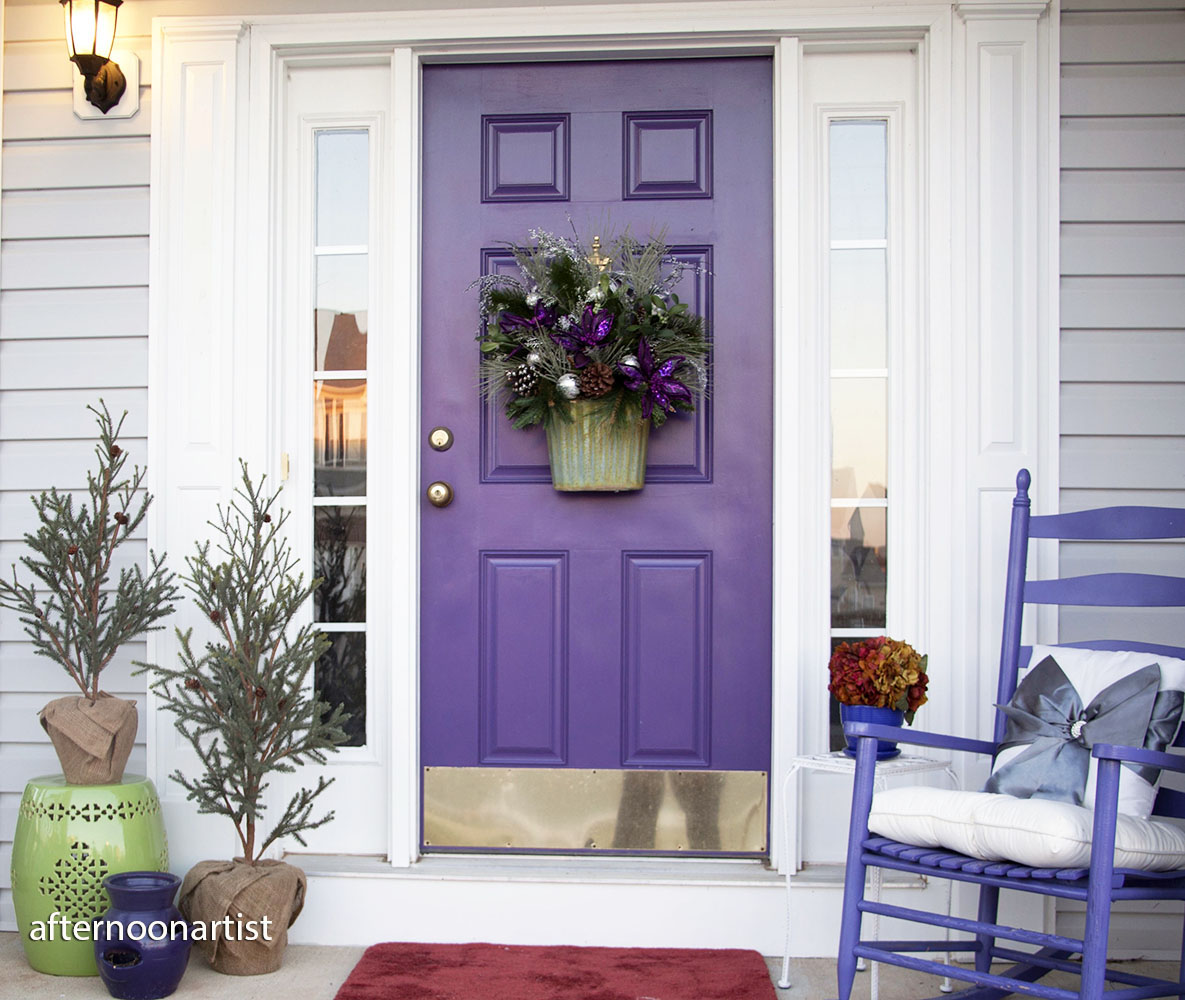
It’s December and I’m still rocking my purple front door and porch furniture. This delicious shade of purple has transitioned easily from summer to fall to winter. And I’m having so much fun with it that I plan on featuring purple once again on my spring porch. Who knew that purple could be so dog-gone versatile?

purple and silver holiday porch decor

For my holiday porch, I kept the same rugs that I used on my fall porch makeover–the rich burgundy and purple colors are perfect for Christmas. I began my holiday makeover by hanging a sparkling purple and silver flower arrangement on my front door.

sparkly silver pillows for my front porch

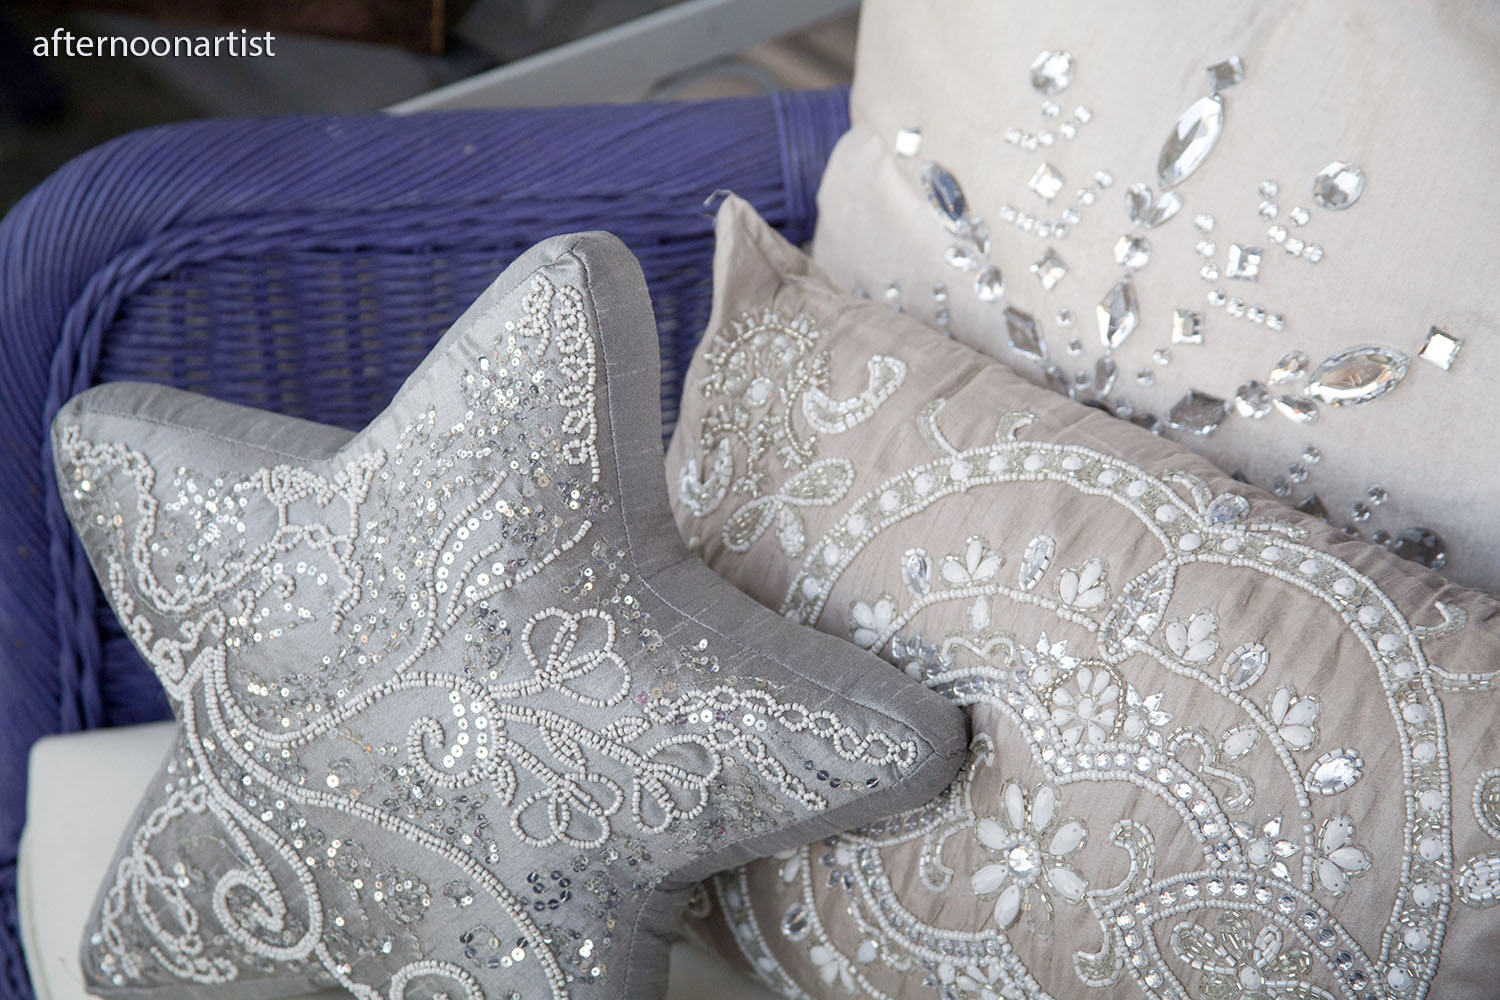
Then I added lots of pillows in a variety of shapes and sizes in muted tones of silver and white. I couldn’t resist these pillows embellished with sequins, crystals, and beads. I used indoor pillows but they typically hold up well on my covered porch.

holiday pillows with sequins, beads, and crystals for my front porch

This crystal owl pillow was just too cute to pass up.

holiday pillow with big silver bow

This white velvet pillow with a big silver bow and crystal button was the inspiration for my holiday porch makeover. Once I found this pillow, I carried it around the store and chose a variety of pillows to coordinate with it.

mini Christmas trees with burlap wrapped pots

I added some mini Christmas trees in pots wrapped with burlap. I like the way the simple evergreen trees and rough burlap contrast with the elegant pillow fabrics. The green, brown, and beige tones add interest and warmth to this otherwise cool decorating scheme.

purple and silver winter porch makeover

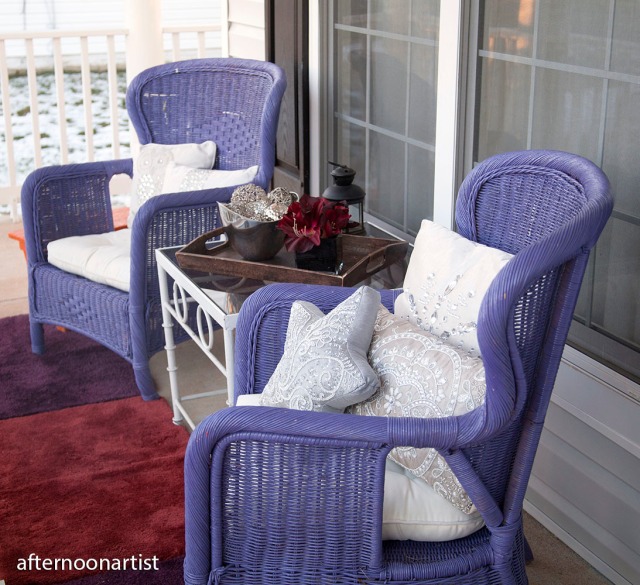
On the coffee table, I arranged a silver bowl filled with sparkly silver accessories, a burgundy silk flower arrangement, and a rusty iron lantern on a simple wooden tray–another combination of glittery and rustic finishes. From start to finish, this winter porch makeover took me less than 30 minutes to pull together (minus the shopping, of course).

purple and silver winter porch makeover

The carpets are bath mats with rubber backing so they stay in place on windy days and I can simply throw them in the washing machine when they get dirty. And the color is holding up beautifully. These rugs have been on my porch for weeks with no signs of fading from the sun.

purple and silver holiday wreath

And once again I’d like to thank Tonya from TwoInspireYou for this gorgeous purple and silver holiday wreath that she custom made for my purple winter porch makeover. Love, love, love it!

Happy Holidays

Christmas fairy in watercolor

Happy holidays from my home to yours. I hope your holiday is filled with laughter and love. I can’t wait to spend the day with my family and friends.

Holiday fairy in watercolor.

Hot Chocolate with Peppermint Whipped Cream

hot chocolate with peppermint whipped cream

Earlier this month, Ashley Pahl of She Makes a Home posted a recipe on her blog for homemade hot coco topped with peppermint whipped cream. It sounded so soothing and delicious that I bookmarked the recipe. So last week when I was housebound during a two-day ice storm, I decided to give it a try.

Unfortunately, I didn’t have all the ingredients on hand to make Ashley’s hot chocolate recipe–and there was no way I was braving the ice storm–so I used my recipe for hot chocolate and topped it with Ashley’s recipe for peppermint whipped cream, which she has graciously allowed me to share with all of you.

Give this recipe a try during the next bout of inclement weather in your area. It will delight your tastebuds and warm your bones.

Basic Hot Chocolate

  • 1 1/2 cups milk
  • 1/2 cup heavy whipping cream
  • 1 T. sugar
  • 3 ounces (3 full squares) semisweet chocolate, finely chopped
  • 1/2 tsp. vanilla
  • Dash of salt

In a saucepan over medium heat, combine the milk, cream, and sugar just until a skin forms on the top of the surface, about 8 minutes (don’t let the mixture reach a simmer). Remove the pan from the heat; add the chocolate and set aside until the chocolate has melted, about 1 minute. Whisk the mixture until the chocolate is incorporated. (The mixture will be mottled with small pieces of chocolate.) Return the pan to medium heat and cook until the chocolate shards melt, whisking often, about 5 minutes. Remove from the heat and whisk in the vanilla extract. Pour into mugs, top with peppermint whipped cream, and serve immediately.

Peppermint Whipped Cream

  • 8 ounces heavy whipping cream
  • 2 tablespoons powered (confectioner’s) sugar
  • 1 tablespoon peppermint extract (it sounds like a lot but it’s not overwhelming)

Mix the whipping cream with a beater until it forms soft peaks. Add the powered sugar and peppermint extract. Beat again to incorporate fully.

Enjoy.